![Zeck-blocks-100-3.png]](https://help.zeck.app/hs-fs/hubfs/Zeck-blocks-100-3.png?height=50&name=Zeck-blocks-100-3.png)
Included in this article:
- Accessing the Editor
- Section Navigation
- Link to Published Zeck
- Settings
- Read Time
- Add Contributors
- Preview
- Publish
1. Accessing the Editor
Click a Zeck Tile from your Homepage to access the Editor. You can also click the Three Dots on the bottom right corner of the Zeck Tile and then click Edit.
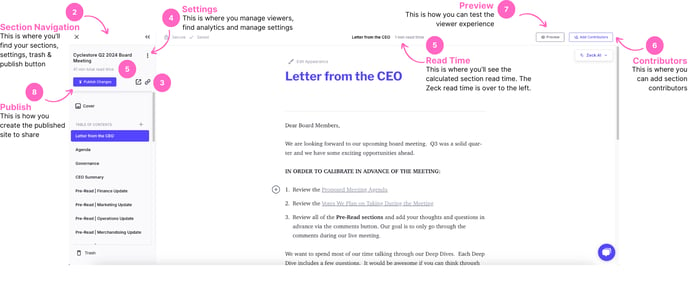
2. Section Navigation
All Sections are listed in the Section Navigation on the left side of your Editor. The Published Zeck will also include a collapsible navigation menu that aligns with the Sections here. Please note that if you are a Contributor and not an Admin, you will not see the full Table of Contents, just those sections where you've been added as a Contributor.
Section Navigation Overview:
-
Navigation: these buttons live at the very top of the Section Navigation.
- Close (X) the Editor and return to your Homepage
- Collapse (<<) the left panel to make your Section Editor full-width. When you collapse the panel, a new button appears that you can click to expand it again.
- Cover is where you’ll add the Primary Cover Image for your Zeck. It’s the background image of your Zeck cover page, and displayed as the tile on your Homepage.
- This is the only item in the panel that won’t be displayed on the Published Zeck’s navigation bar.
- Table of Contents are the main Sections of your Zeck.
- Click the + next to Table of Contents to create a new Section
- These Sections are always displayed in the Published navigation bar.
- Appendix Sections typically include reference materials, background info, nichey details, etc. These are usually linked to from your main sections, and are not included in your Zeck’s total Read Time.
- Click the + next to Appendix to create a new Appendix Section
- Appendix items are grouped in a collapsible section of your published Navigation Panel.
- Trash is where any deleted section live unless you restore them or permanently delete them.
- Hover over any Section and click the 3 Dots that appear to rename, relocate, or delete.
🤓 Pro Tip: You can drag and drop your Sections into any order that you would like within the Section Navigation.
3. Link to Published Zeck (Admin Only)
Once you have published your Zeck, the two buttons to the right of Publish will become active. The Open ↗ button will open the Published Site in a new tab in your web browser and the Link 🔗 button will copy the URL to the Published Site into your clipboard.
4. Settings (Admin Only)
Click the Three Dots to the right of the Zeck Title at the top of your Section Navigation to open the Settings Panel. From here you can do a few things:
- Manage Viewers
- Access the Zeck Analytics
- Change Zeck Settings
- Check the box to Disable Export to PDF on the Published Site
- Check the box to Disable Comments on the Published Site
5. Read Time
This tool calculates the number of minutes it’ll take someone to read your Zeck - go figure. It updates automatically as you work.
- Section Read Time is displayed in the top bar
- Total Read Time for the entire Zeck (excluding Appendix items) is displayed in the top left corner
🤓 Pro Tip:
- Nothing makes a board meeting drag on like endlessly long presentation sections! We’ve introduced a Read Time feature to help keep things moving.
- You will see the Total Read Time at the top of the Section Navigation and the Section Read Time at the top of the Editor.
- This is a great tool to help you keep only the most important information for your board in each section. You can cut down on length (and thus read time) by putting some of your more dense and detailed information in the Appendix and linking it to your sections.
- Studies show that people are more likely to read materials if they can see how long it will take. It’s because of this that your Read Time for each section will also appear in the Published Zeck. You can find the Read Time information under the Section Title and next to the Comments notification.
6. Add Contributors (Admin Only)
The button to Add Contributors lives in the upper right corner of the Zeck Editor.
7. Preview
The Preview button in the upper right corner of the Editor hides all of the Editor buttons and gives you a glimpse of what your Published Zeck will look like. This is a great way to test out what your links to Appendix Sections will look like, review formatting, and test attached files.
⚠️ Reminder:
- During your live meeting, you'll present from the Published Site and NOT from Preview. This will give you access to review all Viewer Comments and to record Votes, etc.
- Your Preview will show you the Zeck Sections based on your User Type Permissions. Admins will be able to see everything and Contributors will be able to see the Sections they have access to.
8. Publish
The Publish button lives at the top of your Section Navigation and will make the Zeck available to anyone who has been added as a Viewer once you share the link with them. Publish is disabled until a change is made to the Zeck. If changes have been made since the last time the Zeck was Published, the button is reactivated as Publish Changes. You can continue to make changes on the backend and your Viewers will never see anything new until you publish the changes.
👋 Need more help? Reach the Zeck Customer Success Team directly at success@zeck.app.